All about the Association of Guilds of Weavers Spinners and Dyers Summer School (16-23 August 2015)
Wednesday, 27 August 2014
Jane Deane introduces Cocoons to Cloth - her silk spinning course
Why am I passionate about silk? Well there are all the usual reasons: the luxurious nature of the fibre, the affinity it has for dye, the fact that most of what is available to us to be spun is actually waste from the commercial industry...Lots of reasons and I’m sure that lots of people share them.My love affair with silk, as opposed to other fibres and yarns, really began at an Association Summer School a long time ago. The course, tutored by Sue Hiley, was amazing and I learnt so much but one of the high spots for me was that Sue had brought along some tussah silk worms to show us. One look and I was captivated!
We were in the middle of a major house move around that time and so my caterpillar activities were postponed until we were settled again when I embarked on raising tussah silkworms. 10 or so oak eating caterpillars were very manageable, but then I discovered that there are many different types of silk moth all with wonderfully coloured caterpillars that emerge from their cocoons as beautiful moths. Unlike their aristocratic cousins, the Mulberry silk moth (bombyx mori), these Saturniidae, or Giant Silkmoths, will eat easily available plant material, including lilac, beech, oak, apple and privet.
I do not much care for the Mulberry silkworms as they are like giant maggots, have no spirit of independence and are fussy feeders. That is hardly their fault as they have been bred for thousands of years to produce high quality silk and haven’t had the option of living as they were originally intended, but I like caterpillars with a bit of spirit! I also love the variety of silk that these wild caterpillars produce. If we have access to Mulberry at Summer School I will raise a few, as well as bringing some tussah caterpillars, so that course participants can see for themselves the miraculous process that gives us silk. There are lots of people who don’t like caterpillars and if you want to do the course but not see the caterpillars I assure you they will be very easy to avoid and will be securely caged!
I do not reel the silk from my caterpillars because my end use for the silk is for hand-spinning and I enjoy the moths but I will have some unbroken Mulberry cocoons so that we can reel them.
Sunday, 24 August 2014
Design Development – Part 3
The last in Alison Daykin's set of three blog posts ... a thorough grounding to get you thinking about Design and her course. As with the other posts this one includes useful advice about what you might bring with you to help prepare for designing in other courses too.
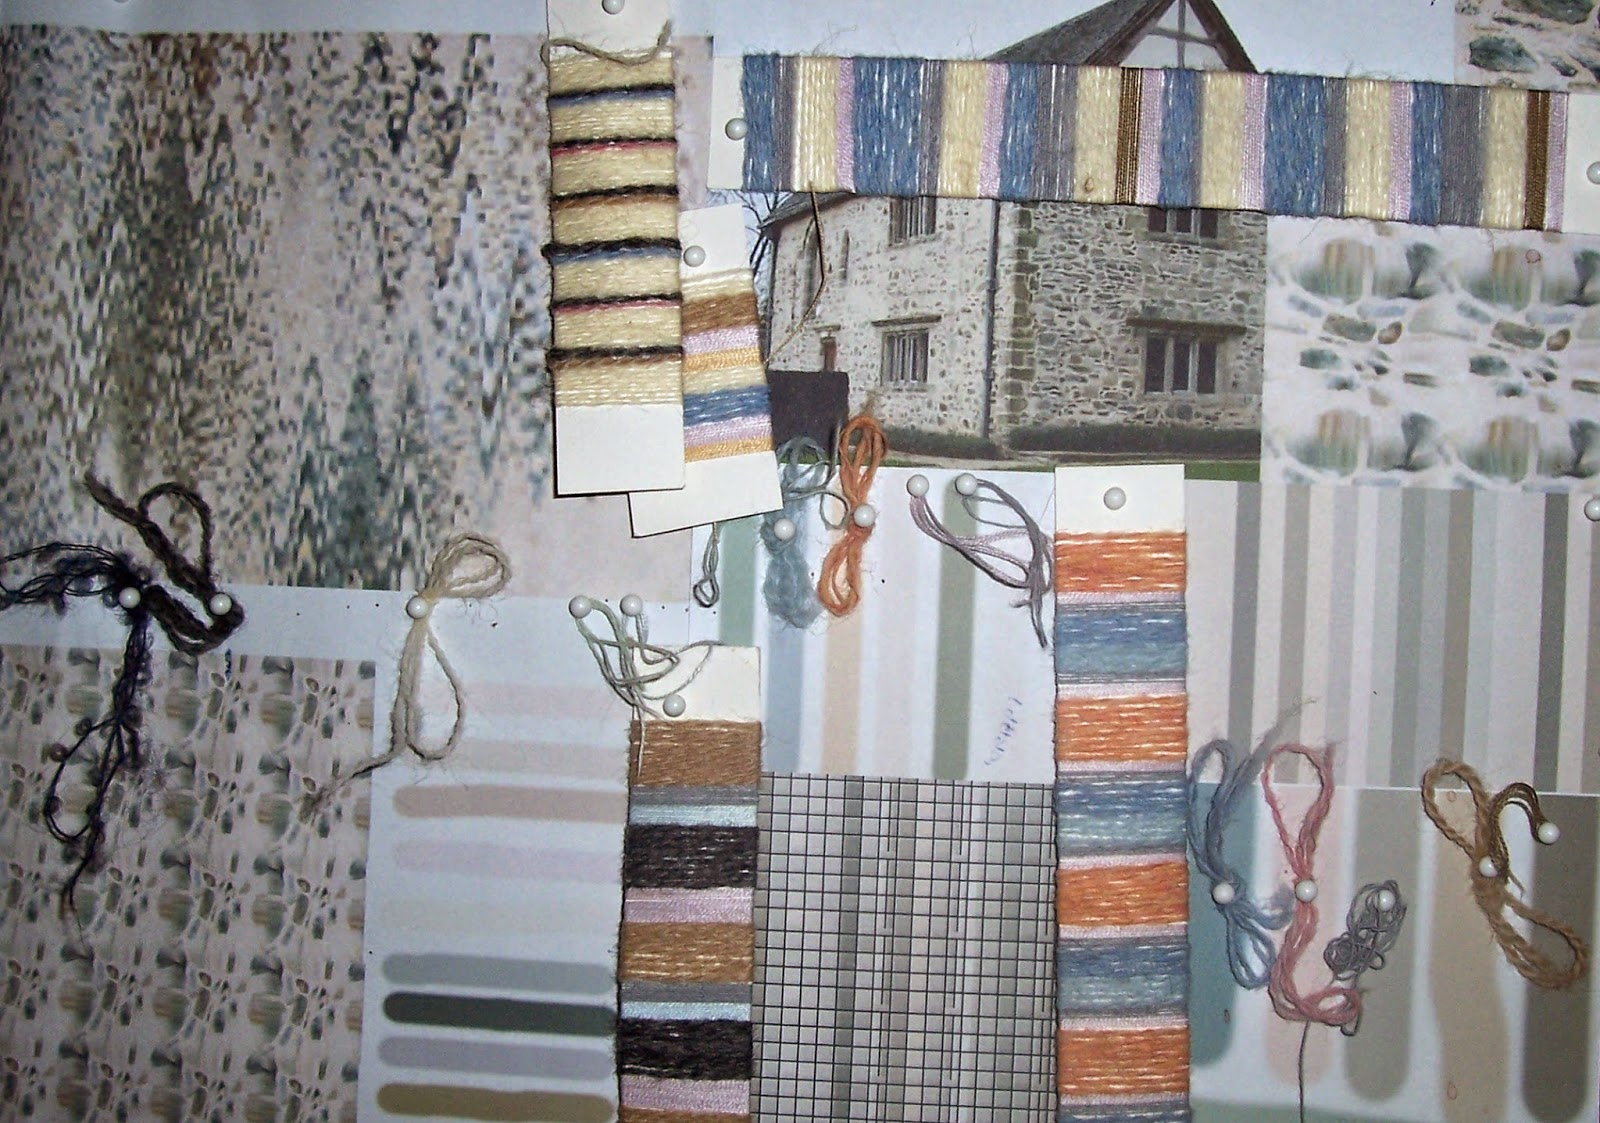
In the last blog post I gave you ideas of what to collect
to bring to Moreton Morrell next year for Summer School. You will see that the title says Design
Development, this is what we will do once our art work has begun and when ideas
pop into our heads. Design development
uses samples to try ideas to see if they work in practice
Now I know you will all have different projects in mind,
so you will all be designing for different disciplines, knit, weave, crochet,
embroidery, etc., etc. So here is a list
of materials and equipment that you might want to bring appropriate to your
discipline:
· Woven fabrics – yarns in the colours of your
inspiration to match the colours in your mood board in a range of fibres that
you may feel appropriate for your project.
Textured yarn to match colours and textures in your inspiration and mood
board.
◦
A small loom with any number of shafts that you are
used to working with. Associated warping
equipment to help you make short warps, such as posts, guide string, raddle,
ties, threading hooks, bobbins, etc.
Record sheets. Tape measure.
· Tapestry – yarns in colours and/or textures of
your inspiration and mood board.
◦
Frame loom, small loom, tapestry warp, tape
measure, bobbins, etc.
· Knit – yarns in colours and/or textures of your
inspiration and mood board.
◦
Needles, stitch markers, tape measure, pins,
etc.
· Crochet – yarns in colours and/or textures of
your inspiration and mood board.
◦
Hooks, stitch markers, tape measure, pins, etc.
· Embroidery – fabrics and yarns in colours and/or
textures of your inspiration and mood board.
◦
Needles, tape measure, frames, hoops, pins,
Wonderweb. Notebook and record sheets.
· Patchwork – fabrics in colours and/or textures
of your inspiration and mood board, sewing thread to match, wadding, paper for
templates.
◦
Pins, tape measure, chalk, etc.
· Spinners – fibres in colours of your inspiration
and mood board. Anything you might want
to insert into your yarns.
◦
Spindle or spinning wheel, bobbins, niddy noddy,
lazy kate, etc.
· Everyone - other bits and bobs you'd like to use
in your samples, such as ribbons, feathers, cords, lace, felt, noils, etc. Books with stitch/weave ideas. Notebook and pen, labels, file and clear
pockets.
I'm sure I've not included every discipline that you might
want use your designs for, nor have I written an exhaustive list of materials
and equipment you might need. I am a
weaver, spinner and dyer and have touched on knit, crochet and embroidery in
the past and have tried to remember what I've used in the past, but you are the
best person to know what extra things you are likely to need. Equally, some of the things I've listed may
not be appropriate, it's for you to decide.
Don't forget that the aim of the course is to give you
confidence and to have fun so don't be intimidated by the list. What you've not got someone else might and
you'll have plenty to work with at Summer School and when you get home.
Thursday, 21 August 2014
Preparing to Design – Part 2
The second of three blog posts about Design. (Link to Part 1 - or scroll down).
In this blog post I want to give you ideas of what to collect in readiness for the design process and
help you decide what you might want to bring if you'd like to join us in 2015 for the Design for the Terrified course.
The list is by no means a definitive one, it will give you ideas and hopefully will
get you thinking about other things you can add to your own collection:
- I collect a range of papers for drawing on, they don't have to be expensive, but different paper gives different effects to your art material; wallpaper lining paper, cartridge paper, sketchbooks, watercolour paper, layout paper, tracing paper, brown parcel paper, cheap sugar paper in a range of colours from discount book shops, smooth, rough, textured wallpapers; A4, A3. Think “blank sheet”!
- My art materials give colour or can be monotone, cheap or expensive; coloured pencils, acrylics, watercolour pencils, watercolour paints, soft pastels, oil pastels, felt tip pens, inks, drawing pencils, charcoal, school paint, biro. Borrow from an “arty” friend to try a new medium. Think what could give colour to paper?
- How do I put marks onto paper? Fingers; art brushes, small or medium decorators paint brushes; sponges, synthetic or natural; potatoes, carrots, etc.; rubbers to remove pencil or charcoal from the paper to give negative spaces; sticks, cocktail, bamboo, twigs, dowel to apply medium or to scratch marks into larger areas of colour. Be open to new ways to apply or remove marks.
- I love to collect miscellaneous papers; sweet wrappers, foil, cellophane; magazines, colour supplements; wrapping paper, hand made papers, tissue paper; cards, birthday cards, christmas cards, post cards; newspapers, comics; wallpaper, glossy, matt, textured. Think colour and texture here and get your family and friends to collect and donate to your collection.
- All the other things! Glue, flour paste, sellotape, double sided tape; scissors, cutting knives and mats; rulers, straight edges; jam jars, plastic bottles; artist palettes, saucers, plates; yarn, fabric, tapes, bandages, ribbon, rubber bands, string; sand, soil, peat, stones, pebbles, shells.
This seems a huge list of things, but I keep them in two crates, papers in one, everything else in the other, plus a bag of miscellaneous bits and pieces!
Tuesday, 19 August 2014
Design for the Terrified (Part 1 of 3 posts)
In this first of her set of blog posts Alison Daykin introduces the thinking behind her Summer School course. Even if you are not doing her course there is plenty of useful advice to consider. Parts 2 and 3 will follow later this week.
What is design?
In Avril Otiv's blog post she stressed that preparation and
good technique were key to most skills, I heartily agree, and this can be
applied to the design process. Design is
the beginning of any project that you want to be unique and beautiful and here
is how I get ready to begin the design process and how you can prepare for the
Design for the Terrified course if you're thinking of joining us in 2015:
What is design?
Despite what most people think, it's not art! You don't need to be able to paint or draw,
there are lots of ways to help you do that, some you even learnt when you were
at school. Design is learning to look at
your inspiration in a number of ways that will help you develop your techniques
into stunning projects. Design work
doesn't have to be shown to any one; it
can be as scruffy or as neat as you like; but should contain all your thoughts,
including written words, and show a logical progression from inspiration to to
project detail.
How to prepare to design
In Avril Otiv's blog post she stressed that preparation and
good technique were key to most skills, I heartily agree, and this can be
applied to the design process. Design is
the beginning of any project that you want to be unique and beautiful and here
is how I get ready to begin the design process and how you can prepare for the
Design for the Terrified course if you're thinking of joining us in 2015:
·
I always have my finished project in mind; this
can be anything from a garment to a cushion for the home.
·
My inspiration is put out on a desk if I'm
working from life or pinned to a board if it's a photograph so that I can keep
looking at it over a few days. This
observation is vital and I usually keep it in view throughout the time I'm
working on a design.
·
I start to prepare a “Mood Board” starting with
a photograph of my inspiration. You can
add pictures of similar inspiration; pictures of similar finished projects, a
type of garment, or cushions, for example; colour samples to match those in my
inspiration in the form of yarn, fabric, paint chips; similar fabrics as you
have in mind for your project such as a knitted swatch in a textured stitch
that reminds you of your inspiration. I
continue to add to my mood board while working on the project.
·
As I start my mood board I also start to collect
together my art materials, paints, paper, etc., in the colours, textures and
shapes that remind me of my inspiration.
I'll talk about this in my next post.
At home, finding a space to work can be difficult,
especially if you've got to share the dining room table with the family at meal
times, but can be overcome. Think
outside the box; a drawing board made
from an off cut of MDF, resting on our knee, could be all you might need as a “
design studio”.
The aim of this course is to give you confidence to start a
project with the design process. It will
help you eliminate huge mistakes, but above all it will be fun; how often are
you given permission to play with pencils and paint, to cut, rip and stick as you did as a child and in doing so begin to develop your designs into
stunning textiles!
Friday, 8 August 2014
Dawn Willey introduces her Rigid Heddle weaving course
Dawn shares some of her passion for rigid heddle loom weaving and explains what experiences her course offers:
My first adventure into weaving was with a rigid heddle
loom. I arrived at a class where my newly assembled (by the supplier) loom was
awaiting me. That afternoon, under the tuition of Rowena Hart from Ashford I
warped and wove my first scarf. Returning home I soon had my handspun alpaca on
the loom. It was magic, I was making real cloth where only loose threads had
existed before! I was hooked and this excitement has never left me.
Some people say that you progress to a shaft loom, however even though I have woven on and added many types of loom to my collection (from backstrap to individual digital thread control), I still continue to use my rigid heddle. Perhaps this is because of it’s speed of warping, low loom waste and versatility, or perhaps the charm of discovering that what is woven on a particular style of loom is, to a large extent, governed by the weaver’s own imagination and willingness to experiment. I am constantly fascinated by what weavers around the world produce using very humble tools, but with great expertise. I love to push the boundaries and am always thrilled when someone cannot easily determine which type of loom I used to produce a particular piece of cloth!
For me, woven structure added to yarn style, fibre content and colour interaction of warp and weft means that weaving will always have horizons waiting to be explored. During this coming summer school I hope to help you to discover some creative new skills to expand your rigid heddle weaving frontiers.
The addition of a few smooth wooden sticks and string are
all that is needed to hugely expand your rigid heddle loom’s weave
possibilities. These are explored in the first of the two short courses where we focus on
‘The Pick-up Pattern Stick and Friends’. We will concentrate on
how we can use a pattern pick-up stick to create warp and weft floats to create
lace and textured weaves. We will discover how useful a heddle rod can be,
learn how to set it up and use it to produce weaves such as twill not usually
associated with rigid heddle loom weaving.
Add a second heddle and this deceptively simple loom takes
on a whole new life and opens the way to many possibilities - the topic of my
second short course is ‘Double the Heddles, Double the Fun’.
Either course can be taken as stand-alone course or you could 'bolt them together' and spend the whole week exploring more of your rigid heddle loom’s potential.
Some people say that you progress to a shaft loom, however even though I have woven on and added many types of loom to my collection (from backstrap to individual digital thread control), I still continue to use my rigid heddle. Perhaps this is because of it’s speed of warping, low loom waste and versatility, or perhaps the charm of discovering that what is woven on a particular style of loom is, to a large extent, governed by the weaver’s own imagination and willingness to experiment. I am constantly fascinated by what weavers around the world produce using very humble tools, but with great expertise. I love to push the boundaries and am always thrilled when someone cannot easily determine which type of loom I used to produce a particular piece of cloth!
For me, woven structure added to yarn style, fibre content and colour interaction of warp and weft means that weaving will always have horizons waiting to be explored. During this coming summer school I hope to help you to discover some creative new skills to expand your rigid heddle weaving frontiers.
It is not only the fun that can be increased but also the
sett possibilities, meaning that much finer cloth than usual can be woven. Did
you know that weaves such as blocks, twill and Theo Moorman Technique can also
be woven on a rigid heddle loom equipped with two heddles? We will creatively
sample as many of them as realistically possible during the course.
Either course can be taken as stand-alone course or you could 'bolt them together' and spend the whole week exploring more of your rigid heddle loom’s potential.
Sunday, 3 August 2014
Patricia Greaves asks 'Why felt'?
The reason why I really enjoy working in
wool is because it lends itself to the simple hand processes to make new
fabrics surfaces and things. I have a background in painting, in
sewing, in pottery, in knitting, in twisting up bits of coloured papers,
in taking photographs but it is the teasing out, the
fluffing up, the stretching or pulling, and the caressing into soft flat
doughnutty pads that is so quick and instinctive. That this can be
simply shaped with a little water (and soap) into a soft pad of
'fabric' is a marvel, and then my mind goes to what can I do with lots
of these!
Patricia's website is http://www.art-felt.com/ if you wish to see more examples of her work.
We learn through touch, and through play and
exploration; we can pause and dwell and take small pockets of time to
think of ideas to take our art or craft further. It may be into the
realm of the useful, to thinking of covering our body, or our neck, our
head or our arms: like playing dressing up when we were little; thinking
what would happen if we just put that bit there, or attached that
different coloured dangly bit there? Or it might be into the the search
for the fantastic, the evolutionary, the 'moody' wall hanging or
gargantuan (lightweight!) sculptural form.
My
work isn't always 'big' (though the work that goes into exhibitions
usually is!) sometimes it is small, a little patch of combined wools,
tatters of silk or cotton fabric and may be even the odd stitch or
needle felted detailing creeps in when the dried fabric calls out for
more attention or a dramatic full 'stop'.
Currently
I'm looking at photos I've taken with my iPad, deliberately swirling
and merging the image to extend my ideas. I've got an App that tells the
camera to take panoramic images and these can be captured as arcs and
circular forms. Ideas are springing up in my mind. I intend to get my
cotton fabrics out, lay down the fibres and any remainder or spare
prefelts I have lying around, and 'do' some felting. I don't know what
it will look like at this moment, all I know is it will not look like
the photographic image, but it will start from there, the fibres won't
'go crazy' on their own, I will have some control, but I am prepared to
let a little risk in, and see what happens.
On
the summer course I'll aim to encourage new ideas, but I'm also well
aware there are some of us who need to know where they are going, and
need to have an end product. Between us we can work through ideas and
plans, and I'm quite good at thinking of solutions especially if some
one's 'wheels are starting to fall off', because they've started an
adventure and are worried about the path along which they are
travelling!
My paths always lead to the seashore or the hills, so be prepared for some wide panoramas.
Patricia's website is http://www.art-felt.com/ if you wish to see more examples of her work.
Subscribe to:
Posts (Atom)