Friday, 14 November 2014

Weaving patterned bands: a desire for individuality

In this blog post Susan J Foulkes reflects on her recent travels and shares an introduction the development of design in the topic that she will teach at Summer School next year ...

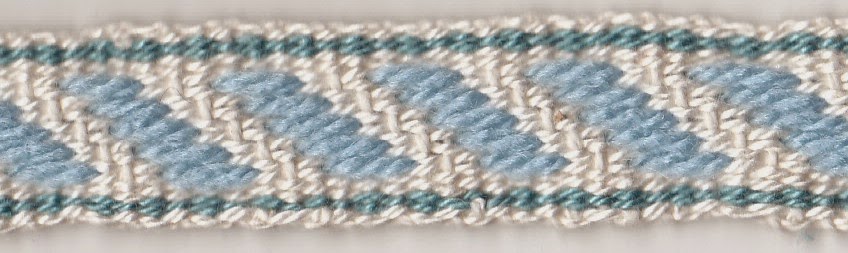
This summer my travels around the Baltic have been richly informative about the patterned bands produced in different countries. During the two workshops at Summer School, I will be sharing some of my findings, and showing the reproductions that I have woven and the bands that I purchased.

In the 1880’s society was changing over the whole of Europe. Some of the changes had a profound influence on peasant culture. Railways increased contact between rural and urban areas, countries freed their peasant populations from serfdom and there was an increased opportunity for some people to emigrate. Chemical dyes and their products, such as printed cottons and dyed thread, became available to village markets. It was at this time that interested groups and individuals became aware of the effects of such radical developments. Ethnological museums opened to try to preserve the best of peasant culture, art and craft, before it disappeared. Unfortunately, despite these efforts, the patterns on woven bands have not been studied in depth nor have the patterns from different countries been compared.

In contrast to this was the focus on examining the images used in peasant embroidery. In Russia, researchers noticed that in the 1880’s a new cross stitch rose design appeared almost simultaneously on embroideries made at a considerable distance apart. As printed embroidery patterns were not used, they wondered how this unique motif appeared so suddenly in so many different places. It was traced to a picture of a rose on the wrapper of a bar of soap, newly produced by a factory, which was sold in village markets. This illustrates that peasant culture has always absorbed fresh ideas and influences. It is highly likely that embroidery would also influence the patterns on bands.

Band patterns were not written down until the 20th century, so weavers would refer to a repertoire of designs woven by their relatives, friends and neighbours. However, it is mistake to imagine that weavers merely copied and reproduced. Any weaver who is skilled at their craft likes to embellish, alter and extend what they can do. Also, patterned woven bands were only part of their ‘best’ dress outfit. In many countries around the Baltic, patterns on the belt were also embroidered onto the sleeves, cuffs and collars of the blouse. In some cases, the pattern would also appear on the woven material for the skirt. Dalarnas Museum in Falun in central Sweden has two such complete outfits. It is highly unusual for complete sets of garments from the 19th century to be preserved. In the Russian Ethnographic Museum in St Petersburg, I saw a lovely Russian costume with a dramatic belt with a bell flower pattern. This was also woven into the material for the voluminous skirt and embroidered around the cuffs of the crisp white blouse.

Weaving designs

I am often asked how did these weavers learn to weave complex designs?
It takes time and lots of practice. Learning to weave was always started in childhood. A child would learn to weave a very simple pattern. At first, a child could copy from another patterned band with help and supervision from an older weaver. The process of learning is to embed the design into the mind and hand and eye so that it becomes automatic. A child will learn to ‘see’ the next pick of the pattern as they become familiar with the pattern structure. Once a simple pattern had been mastered, the design could be expanded. Here is an example of how a simple pattern can be extended.

The 5 pattern thread is a simple design of circles and crosses ‘OXO’
Here the circle pattern has been repeated to form a figure 8.
Patterns can be enlarged by using more pattern threads.

Here is a 7 pattern thread 'OXO' design.
Once a simple pattern has been mastered, it can be placed side by side to produce a wider pattern.

Here is a 13 pattern thread design.
Can you see that it is two ‘OXO’ designs side by side?

An asymmetrical pattern can be made into a mirror image.
Patterns can be woven as a negative image; that is, the background becomes the pattern and the pattern becomes the background. 

Here is part of a very complex 19 pattern thread Latvian belt that I have just woven.


I have trimmed the image so that you can see the two patterns, which are both a negative and mirror image of each other. This band pattern was a remarkable demonstration of weaving skills. There were over 2,500 picks with no simple pattern repeats. I followed a chart, but the original weaver who created this masterpiece would have developed the design as she wove from her own visualisation of the emerging pattern. It is a unique piece. Nowadays, patterns are written down so that beginners can follow the steps for learning in a more straightforward manner. Using the double slotted heddle makes patterns with more pattern threads easier to weave, even for beginners.


Susan J Foulkes
http://durhamweaver64.blogspot.co.uk/


Thursday, 16 October 2014

More about the Spin to Knit course - this time from Carol Leonard

Any of these questions sound familiar?

• What do you do with this yarn?
• Do you need to ply that?
• Is there enough to make.....?
• How do you manage to spin a thicker yarn – I can only manage very thin these days!

• What patterns can you use?

The first question on that list is one that I have been asked so many times over the years. What is more, I have asked it of myself! When I started out, I spun everything I could lay my hands on, with no thought whatsoever as to what that yarn might grow up to be. I then spent many hours attempting to make silk purses out of sows’ ears, entire sweaters out of 6 ounces of Herdwick, and then when I did have enough to make something, being faced with a quantity of left over yarn not quite sufficient to knit .....well, anything, really. And I did love every minute of it, even when a bit frustrated by not quite getting it right.

Gradually, as I learnt more, I started to assess the fibre that I was about to spin. I even – yes, really! – would sometimes do some samples. I came to understand what my wheels could do or I could do with them, how different fibres behaved. The Cormo lesson could have been a bitter one as, completely inexperienced with this fleece, I did not remember to sample, spun what I thought was a fine yarn only to have it poof up into more like a DK weight on washing! Fortunately, there was just enough to make a cosy shawl, if you ignore the fact that the border is merino and silk!

“Spin to Knit” came about because I came to the realisation that I, as something of a reluctant knitter initially, had collected over the years a rag tag body of information about spinning yarn and what could be done with it. And that it would be great fun to share this with people, whilst at the same time benefiting from what they might have discovered as well.

So in this course, we shall be looking at fibre and yarn and projects in a coherent way – what process might work to what end, there are many ways to express it. The whole craft of hand spinning has changed hugely from when I first learnt, with a sack of unwashed fleece of uncertain origin at my side, and maybe a simple dog comb to hand if I remembered. I could take it one little step at a time, and nothing wrong with that, of course, but maybe learning a few tips, wrinkles and shortcuts might be a good thing, eh?

 Because Pete and I team teach this class, we are able to encourage very new spinners to take it. As long as you have had a little tuition, can treadle reasonably fluently, draft a yarn that is not so twisty that it refuses to go on to the bobbin, you will be fine. This is not of course to say that more experienced spinners will not find plenty to keep them occupied as well!

Sunday, 5 October 2014

Martin Weatherhead introduces his Ikat Weft course for 2015


Martin Weatherhead (pictured in his ikat woven 'snail coat' here describes his plans for the 2015 summer school and the roots of his interest in ikat).
I was first introduced to Ikat by the Japanese weaver Jun Tomita in a workshop with the Ceredigion Guild back in 1979.  We wove warp Ikat samples using Indigo.  Later, with Mary Restieux, I discovered you could have as many colours on a single thread as you wanted.  What an eye-opener!  From then on I was hooked,  experimenting with both warp and weft Ikat.

In 1998 I gained a Winston Churchill Travelling Fellowship to study Ikat in Central Asia.

At the 2013 Summer School in Carmarthen we experimented with warp Ikat.

This time we will be exploring weft Ikat. We will concentrate on balanced weave because the patterns show up more readily. The most striking thing is the way the patterns move. The patterns shift left and right as you weave creating a diamond mesh. The process is dynamic. The pattern is affected not just by how you dye the threads but also how you weave them.

We will examine how to control this dynamic technique and we will create a variety of patterning both with static blocks and with shapes that move.

The principles can also be applied to weft- faced weaves. My rugs (below) are weft-faced. 

Click on image to see weaves in more detail

The ultimate in weft Ikat is Picture Kasuri to give it its Japanese name. This is where a single weft is Ikat-dyed over a distance of many meters and when it is folded up in the weaving process the picture emerges as if by magic. This will be covered more in theory than in practice but it would be fun if there was time to try making one as a group so that everyone could take away an Ikat weft to weave at home.       

Picture Kasuri lobster by Jun Tomita         

Monday, 29 September 2014

Debbie Tomkies – A Dyer’s Recipe Book


When I was putting together this course I asked myself, what would I have liked to have known when I started out as a dyer 25 years ago? And the answer was both simple and a bit embarrassing!

When it comes to writing books, articles or patterns, preparing handouts and tutorials, I am a highly organised, note-taking, sticky-note wielding, filing fanatic. A place for everything and everything in its place was my Grandad’s motto and I’ve always (tried) to follow it. But my art was another story, particularly my dyeing. I have samples and photos from “back in the day” with no idea what dyes I used, what yarn it was and how I created the effect. So, some years ago I decided to start recording my processes and methods, keeping my colourways and building what is now a substantial catalogue of recipes.

Do I wish I’d done that from day one? I certainly do. Do I wish I’d had the opportunity to make a big headstart on my recipe catalogue back then, I certainly do. So, if you are a serendipitous dyer who would like to get your dye catalogue started or an experienced dyer who keeps telling yourself you’ll get more organised “next time”. If you’re a bit daunted by the thought of all that measuring and recording, or if you’re a natural-born organiser and like to have all your knowledge at your fingertips, saving time (and money) by being able to quickly replicate your favourite colours, I think you’ll love this course.

The course will be broadly in two parts and you can join both parts or just one. In the first part, we'll be making sample cards using wool as our primary fibre type. We'll be building a reference recipe book and the aim is that at the end of the course you'll have a good selection of repeatable recipes that you can use as an ongoing resource. There will also be the opportunity to work with alternative fibres to wool and to try out your recipes on a larger scale, as well as playing with some fun techniques and dyeing methods. I haven't finalised the course timetable yet but broadly speaking I anticipate it will look something like this...

Essential dyeing principles:

  • Depth of shade (DOS) - what it is, how it works and how to calculate it to get the results you want
  • Colour mixing and blending
  • How fibre type affects colour
  • Record-keeping - ideas for keeping track of your experiments, projects and colourways
  • Putting it into practice:
  • Colour theory basics:
  • Producing great colour schemes and colourways
  • Working with inspiration materials (photographs, fabrics, pictures, objects etc.) and using these to develop successful colourways
  • Dyeing techniques and methods:
Exploring a range of interesting dyeing techniques to produce great yarns that look the way you want them to!

This part of the course will run twice so students can join for just half the week if they wish (either the first or second half of the week). For students who want to get deeper into colour or who would like to continue with their recipe book, try additional techniques or work on their own projects, there will be the opportunity to stay on for the full week. For these students, I'll be there to provide guidance, support and ideas but the structure will be less rigid and more self-directed.

The images used in this blog post represent some of the work from earlier Summer Schools. To see more examples you can follow this link. These were for a different course in that it was more about techniques and less structured around recipes but they should give you a good idea of how much fun we have!

EXTRA (ADDED) INFORMATION FROM DEBBIE ABOUT MATERIALS COSTS: To ensure everyone gets the maximum benefit from the course and consistent results, all materials are supplied. This includes a selection of lovely yarns from our extensive range (200-300g), sample cards, dyes etc. The charge for all materials is £30 for short course students (part week). Students staying on for the full week will receive additional sample yarns, sample cards, dyes etc. and will be able to bring their own yarns/fibres etc. to dye. For full week students the materials fee will be £40. There will also be lots of lovely yarn and fibre to buy during the week if anyone needs any extras.

I do hope you're inspired to join me and please don't hesitate to get in touch via my email, debbie@dtcrafts.co.uk, if you have any additional questions. My courses are always flexible and I like everyone to have a great time so I'm sure you'll enjoy it :-)

Sunday, 21 September 2014

Eccentric weaving and Coptic techniques with Louise Martin

Caption: Amara looked at the sun
and the lay of the land
Here Louise Martin talks about her Woven Tapestry courses on Eccentric weaving and Coptic techniques (with some stunning examples, click image to expand)

Over the past 20 years I have produced work that is a response to the countries I have lived and travelled in. At first I incorporated superstitions, traditions and folklore, however, latterly I have become interested in capturing the essence of the land and my feelings towards it. As I walk in Mongolia or Turkey or Iceland, I clear my mind, open my senses, and allow the surroundings shape the result. When beginning a weaving I choose my palette, but I do not  interpret from an image or cartoon, preferring to work from my internal feelings, trusting in my experience and technical expertise. As a result my work has become more meditative and joyful in production, and the surface livelier, due to the exposed warps and eccentric wefts.

(Caption: Near the land of dinosaurs)
Caption: Eccentric weaving
Amara looked at the sun and the lay of the land and near the land of dinosaurs were both inspired by my travels in Mongolia and are both constructed with wefts woven at different angles to the warps - eccentrically. Another image, eccentric weaving, was woven during a two month residency in Turkey last year and clearly shows the movement of the weft threads. This is one of many eccentric methods which will be covered during the short course.

In Coptic bird and Coptic flower I have used Coptic imagery and techniques, including eccentric weaving. These were woven for a British Tapestry Group exhibition titled Tapestry Mischief, where images from old tapestries were interpreted in a contemporary way. Conventional tapestry is weft faced, but in many of my new works the warp is exposed.

I have been lucky enough to see many Coptic tapestries over the years in the Metropolitan Museum of Art, New York, the Cluny Museum, Paris, the V&A, London and the Islamic and Coptic Museums in Cairo. The tapestries are often exquisitely woven, with a refined palette. For the course I aim to bring my collection of Coptic publications and a couple of small Coptic pieces I am lucky enough to own.

Tuesday, 16 September 2014

Spin to Knit: Thoughts by Pete Leonard

The Spin to Knit course is the only one which is taught by two tutors. Carol and Pete Leonard will offer an opportunity to spinners who can spin at a basic level (a continuous thread) and those who are more experienced spinners.  Pete here draws on some examples from his own knitting.

My mother taught me to knit, close to 60 years ago; I’ve been spinning, and a Guild member, for 25 years. I still count myself only a beginner weaver. While I am aware that there is an excellent organisation devoted to knitters and crocheters, I also know that there are many more people who spin and knit than there are those who spin and weave.

It was with this thought in mind that we devised the course “Spin to Knit” that we taught, successfully I think, at Summer School 2007 in Lincoln. We’ve revised the content of this course quite substantially, but our purpose remains the same: to cater for spinners who want to knit their handspun yarn.

Many spinners routinely create their usual generic yarn with not much thought to what the end purpose is to be. In this course, we will explore the different methods of fibre preparation, drafting, types of fibre and how these work together in creating a suitable yarn for our chosen purpose.

All knitters know the importance of swatching, even if we sometimes ignore it. When knitting a commercial pattern, especially if using the yarn recommended, it is possible to get away with not swatching. With handspun yarn, you risk spending a lot of effort, ultimately to be disappointed in the outcome; ask me how I know! Some years ago, I knitted a jacket type of sweater for a friend’s 50th knitted a small swatch and determined that my gauge was 5 stitches to the inch. I can’t remember exactly how far I got – but it was a long way, as I am good at sticking my head in the sand - before admitting that what I was making was more like an overcoat! An error of one stitch per inch in such thick yarn made an enormous difference; my friend eventually received his gift for his 51st

The photo on the right reminds me of another reason for being aware how my yarn will behave when knitted. I derived the pattern for this sweater from Priscilla Gibson Roberts’ excellent Knitting in the Old Way; I owe her a great debt for being the person who taught me to spin on a top whorl spindle. One motif is a cable that shows up perfectly well in my slightly variegated handspun, dyed Polwarth. The other is a series of triangles, formed by purling nine stitches, then eight, seven, decreasing to one(with the remaining stitches knitted) on successive rounds. This actually shows up much better in the photo than “in the flesh”. I am quite happy with my sweater (except that we hardly ever get weather cold enough to warrant my wearing it) but I could have loved it even more if I had done a larger swatch and chosen a more appropriate alternate motif.

I am currently knitting a “Diamonds” sweater, using a nice dyed wool/mohair blend. The photo in the pattern, from the Wensleydale Longwool Sheep Shop, uses a plain coloured commercial yarn that shows the diamonds very sharply. Yes, there are diamonds in my swatch! I made the conscious decision to continue with the sweater, as I believed that the pattern would show up better in the full
piece. This is proving to be the case; making a good sized swatch has enabled me to make an informed choice.

This course will look at various types of fibre; the different methods of preparing them or the commercial preparations available; the drafting methods that could be used; the nature of the resulting yarn; and matching the type of project with the yarn. You will have the time to make your own swatches and compare the different effects of long and short draw, thicker and thinner yarn, “solid” coloured or variegated yarn, singles and plyed yarns, and a good deal more. As we always say when introducing ourselves, our primary purpose is for you to have fun.

Thursday, 11 September 2014

Lace Weaving : Huck and Bronson

In the latest tutor blog post Anne Dixon offers us a clear (and well-illustrated) overview of her course:

The aim of this course is to use and experiment with the huge variety of possibilities available with both Huck and Bronson lace, comparing and contrasting them. Lace weaving is usually treated as separate types, each with its own rules as to threading and weaving. 

I enjoy exploring the structure of weaves, always querying the standard and asking “Why?” and “What if?” I want to encourage others to approach designing in the same way. There will be information sheets at all stages, with suggested weft patterns as well as design sheets to create your own patterns.

Bronson warp & weft spots
With Huck and Bronson the standard rules, of blocks and ‘profiles’ mean that the linear patterning is horizontal, vertical or diagonal, but even within the rules there can be diversity of numbers within each unit, to create different patterning.  Bending the rules only slightly can result in a variety of patterns, even with a standard threading, whilst breaking the rules means that a variety of curves can be woven.

Huck warp & weft spots
With a standard threading the number of possible lace units depends on the number of shafts available. This is always two less than the number of shafts. Eight shafts gives six possibilities, sixteen gives fourteen. Table and dobby looms mean that all the possibilities can be used singly or in combination.   For the class I suggest an eight-shaft table loom, this will give an insight into the possibilities. However, if students wish to use a loom with more shafts, that is not a problem!


We will be weaving samples – not yardage, so the width will be narrow. I will contact each student to find out what is their loom width, shaft numbers, and preferred yarn. Then I can divide the class evenly into Huck and Bronson and send each student a warping draft so that the looms can be pre-warped. Get someone to help you with this if needed! Then we can get to work immediately.


Everyone will use their own threading for two days; cut off the samples; then exchange to the other type of lace threading for two more days and back again to your own loom with even more ideas. Lace needs to be washed to see the full impact, so this will give time for that. 

Finally, by going even further and using a simple Rosepath threading, there is even greater freedom to position the lace units – we will also explore this.